Changing Your Windows Desktop Background: A Simple Start
Are you looking to change your Windows desktop background but unsure where to start? No worries! Whether you’re on Windows 10 or 11, personalizing your digital workspace is super easy. This guide will walk you through the process, step-by-step, so you can have a fresh new look in no time.
Let’s dive right in!
Accessing the Right Menu
First off, you’ll want to get to the right menu. You can do this in two different ways, which is great because it gives you options based on your mood or the device you’re using.
Method Using the Right-Click Context Menu
Just right-click anywhere on your desktop. This will bring up a prompt drop menu. From here, you can directly apply a built-in wallpaper or choose a different image. It’s a simple way to get started. If you want to set a specific image, just select “Personalize,” and you’ll be taken to the settings where you can choose what you wish to set as your background.
Using the Start Menu
Alternatively, you can access the settings via the Start Menu. Just click on the Start button (or hit the Windows key on your keyboard) and type “background.” You’ll see the option pop up to change your desktop background. This method is particularly useful if you want to explore more options like solid colors or slideshow backgrounds.
Choosing Your Background
Once you’re in the personalization settings, you’ll encounter a dropdown menu that allows you to select how you want your background to look. You can choose from several options like:
- Picture: This lets you select an individual image from your files.
- Solid Color: Perfect if you’re into minimalistic designs.
- Slideshow: Want to keep things fresh? This option allows you to use multiple images that change at intervals you choose.
What’s cool is that Windows stores default themes, so you can easily revert to them if you ever feel nostalgic.
Applying Your Changes
After you’ve made your selection, you’ll want to apply it. You can do this directly by selecting the option from the dropdown and hitting the “Apply” button. Depending on your selection, the change might show up instantly on your screen. If you used the slideshow option, you can also define the arrangement via a few choices, like how long each image stays on display.
Here’s where it gets fun: If you’re feeling adventurous, you can even use a key combination to cycle through your wallpapers if you’ve set up a slideshow. Just hit the “Windows” key plus “L” to lock your screen and see how it all looks together. Boom! Instant transformation!
Don’t forget, you can also select how your background fits your screen. There’s a “Choose fit” dropdown that allows you to adjust how the image displays—whether it’s centered, stretched, or tiled. This little detail can make a big difference in how polished your desktop looks. I remember when I first discovered this; it felt like I was giving my workspace a makeover!
So, whether you’re looking for a serene landscape, a vibrant abstract design, or just a solid color that matches your mood, changing your Windows desktop background is a breeze. Just remember, it’s all about making your space feel like you.
Navigating the Start Menu and Context Menus
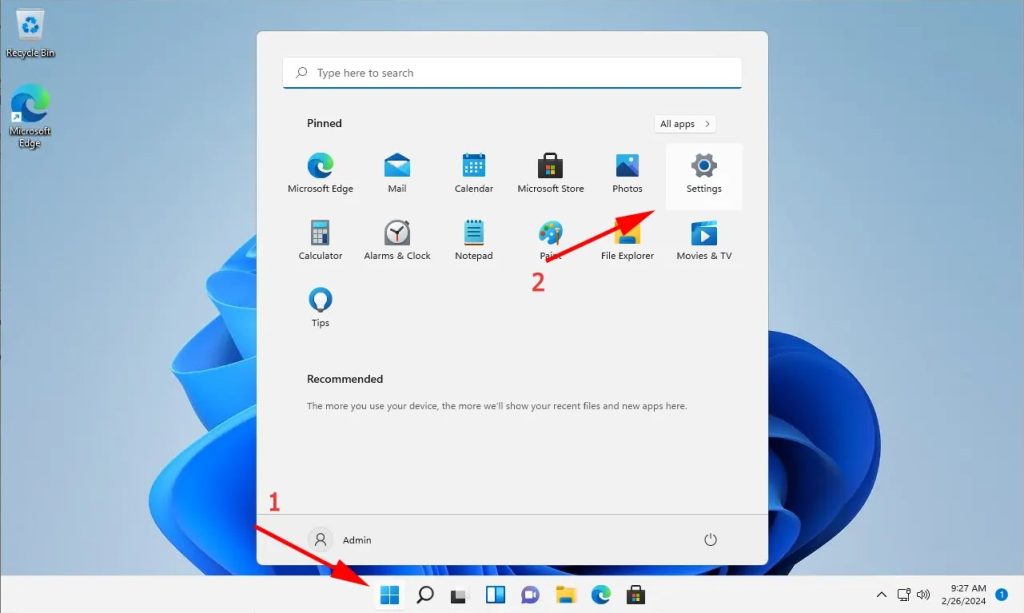
To change your desktop background in Windows 10 or 11, you’ll first need to get familiar with the Start menu and context menus. These are your main gateways for customizing your Windows desktop. It’s a bit like having a treasure map; once you know where to look, you can uncover a lot of gems.
When you click on the Start menu (that Windows icon usually found in the bottom left corner), you might be surprised at how many options are laid out before you. I remember the first time I clicked it and felt like a kid in a candy store. Not only can you launch applications, but the Start menu also provides quick access to settings, files, and even the Microsoft Store.
Accessing the Settings
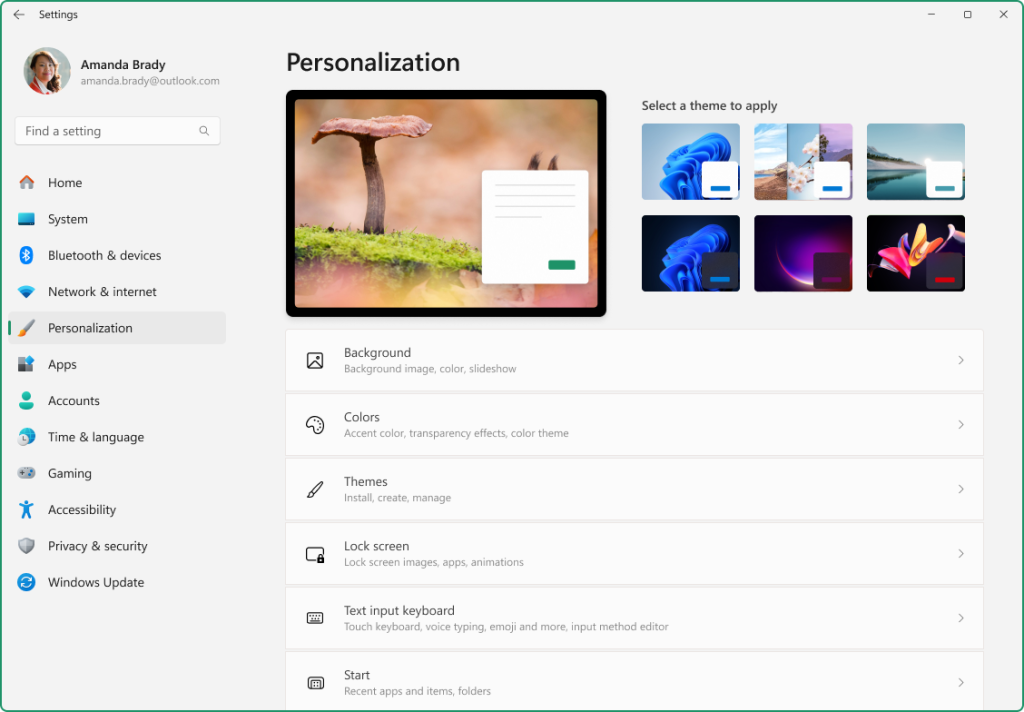
Now, if you’re looking to change your desktop background, you’ll want to dive into the Settings. You can either scroll through the Start menu or use the Windows search bar to speed things up. Just type “Settings” in the search bar, and boom! You’re in. From there, navigate to the Personalization section. This area is your playground for anything that makes your desktop feel like home.
Using Context Menus
Another handy way to change your desktop background is through the desktop context menu. Just right-click on any empty space on your desktop—yes, that’s right, any empty space! This action opens up a menu filled with options. Look for “Personalize,” and when you click it, you’ll be taken directly to the same Personalization settings we talked about earlier.
What’s wild is how quickly you can get there without even opening the Start menu. It’s like discovering a shortcut in a game that lets you skip to the good parts!
Navigating File Explorer
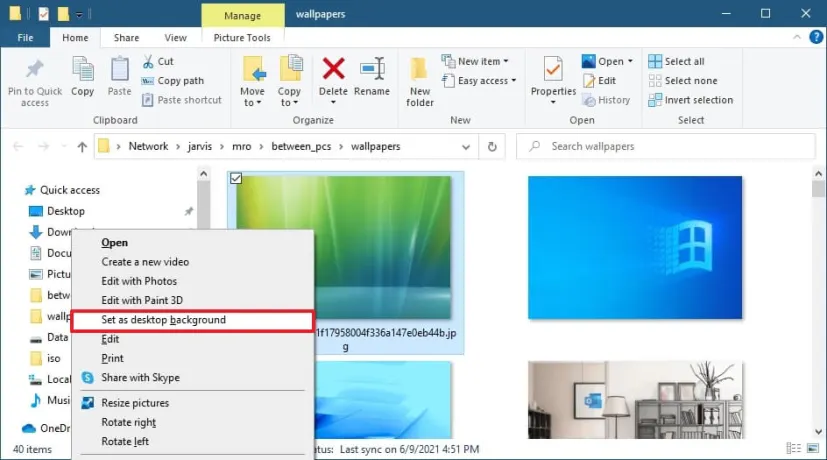
If your heart is set on a custom image for your Windows desktop, you’ll want to explore File Explorer. This is where you can browse your folders to find that perfect picture. Just hit the Windows key + E to open File Explorer (that’s the key combination I often use). From there, you can navigate through your files, or even create a new folder if you want to keep your desktop background images organized.
Once you find your desired image, right-click on it and select “Set as desktop background.” Just like that, your desktop transforms into a reflection of your personality.
Customizing Further
Feeling adventurous? You can even explore the Microsoft Store for live wallpapers or themes that can jazz up your desktop experience. Just type “Microsoft Store” in the Windows search bar and browse away. You might find something that really speaks to you—a dynamic background that changes with the time of day, or a theme that matches your mood.
In this vast world of customizing Windows, the Start menu and context menus are your best pals. They make it super easy to access everything you need for changing your desktop background. Just remember, the more you explore, the more you’ll discover ways to personalize your space. And trust me, it makes a world of difference!
Using the Windows Search Bar to Find Settings
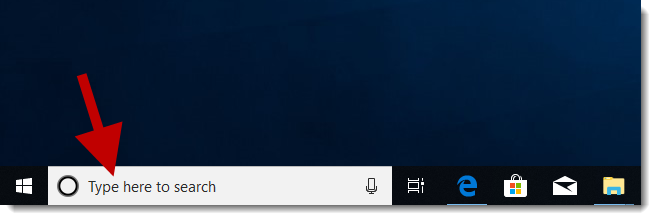
The Windows search bar is your best friend when it comes to customizing your desktop background. Instead of sifting through the Control Panel or Settings app, a quick search can lead you right to what you need. Whether you want to change your background to a new picture, set a solid color, or adjust the accent color on your desktop, this tool can save you time and effort.
When I first started using Windows 10, I was overwhelmed by all the options. I remember spending ages navigating through menus, only to realize I could have just typed “background” into the search bar. It was a game-changer! You can get straight to the settings you need with just a few keystrokes.
How to Use the Search Bar
To get started, simply click on the search bar located next to the Start menu. You can either type “background” or use more specific terms like “color settings” or “solid color option.” Windows will automatically suggest relevant results, allowing you to quickly pick the right setting.
If you’re looking to change your desktop wallpaper, for example, typing “change background” will show you the “Change Desktop Background” option immediately. Click it, and you’re there! You can select a picture from your “pictures folder” or choose a solid color option. Want to get creative? You can even set a picture as your background and adjust the picture position to fit your screen perfectly.
Customizing Your Colors
Now, if you’re feeling adventurous and want to play around with your accent color, type “color settings” into the search bar. This will bring up the color settings menu, where you can decide on the accent color that suits your style. I once spent a whole evening experimenting with different shades, and it felt like I was designing my own mini art gallery. You can select from a range of options or even create a custom accent color if you’re feeling inspired.
Another tip: if you want to create a mood with your desktop, try switching to a dark theme. Just search for “dark mode” and enable it. The effect can transform your desktop experience, especially in low-light environments. It’s like giving your computer a cozy, evening vibe.
Quick Access to Background Sounds
What’s equally cool is that you can also search for “sounds” to change the audio settings associated with your desktop. For instance, if you want to set a unique sound for when you receive notifications, just type “sounds directly” in the search bar. This will lead you to the sound settings where you can choose from various sound schemes. You can even upload your own sounds for a personal touch!
A Few More Tricks
If you want to make adjustments on the fly, consider searching for specific terms like “solid color” or “set picture.” You can quickly toggle between options without having to dig deep into menus. It’s like having a remote control for your desktop customization right at your fingertips.
What’s wild is that once you get the hang of using the search bar, you’ll find yourself relying on it for all sorts of settings, not just background options. You’ll be customizing everything from your taskbar to your file explorer in no time.
So, the next time you’re ready to change your desktop background, remember: the Windows search bar is there to help you navigate swiftly. You’ll not only save time but also discover new features you might not have known existed. Happy customizing!
Choosing Your Desktop Background: Solid Colors vs. Pictures
When it comes to customizing your desktop background in Windows, you have two primary options: solid colors or pictures. Each choice offers its unique vibe and can set the tone for your workspace. If you’re like me, you might find yourself debating between a sleek, minimalist solid color and a vibrant image that sparks joy every time you log in.
Solid colors are a fantastic option if you’re looking to keep things simple and uncluttered. They can create a calm environment, especially if you tend to have a lot of windows open. Imagine a soft blue or a gentle green — it’s like a breath of fresh air for your screen! Plus, with a solid color, you don’t have to worry about how it will look across different monitors, especially if you’re working with dual monitors. The color will fill the entire screen, keeping everything looking neat and tidy.
Now, let’s talk about pictures. Honestly, this is where it gets fun. Windows offers a surprising variety of images right within the settings, making it easy to find something that resonates with your personality. Whether you’re into breathtaking landscapes, cute animals, or abstract art, there’s something for everyone. For instance, I recently switched to a stunning mountain scene, and every time I see it, I feel like I’m on a mini vacation — it’s a great mood booster!
But here’s something to consider: when you choose an image, it’s essential to think about the aspect ratio. If the aspect ratio of the picture doesn’t match your monitor’s screen resolution, Windows will either stretch or compress the image, which can lead to a distorted picture display. You don’t want your favorite sunset looking squished or stretched out, right? That’s why keeping proper aspect ratios is key. It ensures that your images look just as they should, whether you’re on a smaller or larger screen.
If you’re using multiple monitors, you might want to apply different backgrounds to each. Windows allows you to set individual backgrounds for each monitor, which is super handy. You can have a serene ocean view on one screen and a funky abstract design on another. This way, you can create a cohesive yet exciting workspace that reflects your style.
Now, let’s dive into how to make your pictures display just right. Windows provides options such as “Fill,” “Fit,” “Stretch,” and “Tile.” Each option adjusts how the image appears on your screen. For instance, if you choose “Fill,” it will stretch the image to cover the entire screen, which is great for larger displays, but it might cut off parts of the image. On the flip side, selecting “Fit” will ensure the entire picture is visible, but you might end up with some empty space around it if the aspect ratios don’t match.
Another cool feature is the “Tile” option, which can give a fun, patterned look if you have a smaller image repeating across your screen. I tried it once with a delightful floral design, and it added a cheerful touch to my workspace. The key is to experiment with these settings to find what feels right for you.
Here’s what’s wild: I once had a situation where I set a background that looked fantastic on my laptop but was totally off on my larger monitor. The colors were washed out, and the image didn’t align well. That was a real lesson in checking the screen resolution and aspect ratio before settling on a final choice. So, always make sure your background is supported by your monitor setup.
Ultimately, whether you go for a solid color or a picture, the goal is to create a desktop that inspires you and makes your work environment more enjoyable. Your desktop background is more than just a pretty image; it’s a reflection of your personality and creativity. So go ahead, get creative, and choose what makes you happy every time you sit down at your computer!
Adjusting Picture Position and Aspect Ratio
Once you’ve selected a picture for your desktop, the next step is to make sure it fits your screen perfectly. This involves adjusting the picture’s position and aspect ratio, which can really enhance your overall computer experience. I remember the first time I set a wallpaper; I was excited but ended up with a stretched image that looked nothing like the stunning landscape I had chosen. So, let’s dive into how to avoid that!
Changing the Position
After you’ve set a new wallpaper, you might notice that it doesn’t quite look right. This could be due to the way Windows displays the image. To adjust this, right-click on your desktop and select “Personalize.” From there, go to the “Background” section. Here, you’ll see options for how your picture is displayed.
You’ll typically find several choices: “Fill,” “Fit,” “Stretch,” “Tile,” and “Center.” Each option changes the way your image appears on the screen. For instance, if you want the image to take up the entire screen without any empty spaces, choose “Fill.” But if you want to maintain the original size of the image, “Center” might be the way to go.
What’s wild is that it can take some experimenting to find the one that works best for you. I once had a breathtaking photo of a mountain range, and it looked stunning when set to “Fill.” But then I tried “Center” and realized I was missing out on the full beauty of the image!
Maintaining Aspect Ratio
Now, let’s talk about aspect ratio. This is crucial because an image with the wrong aspect ratio can appear distorted. Windows helps you out a bit with this by offering those display options I mentioned earlier. When you select “Fit,” for example, Windows will automatically adjust the picture to maintain its original proportions, ensuring it doesn’t look squished or stretched.
If you choose “Stretch,” be prepared for a potential visual mishap—your beautiful image could end up looking like a funhouse mirror reflection! I learned this the hard way with a lovely sunset photo that ended up looking like an abstract painting instead of the serene scene I had in mind.
Getting It Just Right
If you’re a bit of a perfectionist like me, it’s all about finding that sweet spot where the picture looks just right. Sometimes, I’ll go back and forth between the settings, adjusting and readjusting until it feels perfect. It’s like tuning an instrument; you want it to resonate just right.
Also, keep in mind your computer’s resolution. High-resolution images will look better when displayed on high-resolution monitors. If you’re using a lower resolution image on a high-resolution display, it might look pixelated no matter how you adjust it. So, always try to download high-quality images that match your screen’s capabilities.
Saving Changes
After you’ve found the perfect settings for your picture, don’t forget to save your changes! Just click on the “Save changes” button that appears at the bottom, and voila! You’ll enjoy your new desktop wallpaper every time you boot up your computer.
This process of adjusting the picture position and aspect ratio can truly transform your desktop experience. It’s like dressing your computer in its best outfit! Now, go ahead and play around with those settings—who knows, you might discover a new favorite way to showcase your stunning images!
Setting Up a Slideshow Background
A slideshow background is a fantastic way to keep your desktop lively and visually appealing. It rotates through multiple images, which can really change the vibe of your workspace. Personally, I love using this feature because it feels like a mini escape every time I glance at my screen. Whether it’s a breathtaking mountain view or a cherished family moment, it brings a little joy into my day.
How to Set Up a Slideshow Background
Getting started with a slideshow background on your Windows 10 or 11 machine is easy-peasy. Here’s how to do it step by step.
- Right-click on your desktop: This opens up a context menu. You’ll want to select Personalize. This is where all the fun begins.
- Navigate to Background: In the left sidebar of the Personalization settings, click on Background. Here, you’ll see a dropdown menu where you can choose your background type. Select Slideshow from the options.
- Choose Your Pictures: Now comes the fun part! Under the “Choose albums for your slideshow” section, click the Browse button. This will allow you to select the folder where your favorite images are stored. I recommend picking a folder that has a mix of your most-loved images.
- Set the Interval: You can determine how often you want the pictures to change. There’s a dropdown menu named Change picture every. You can choose intervals ranging from 1 minute to 1 day. I usually go for every 10 minutes because it strikes the perfect balance for me.
- Shuffle Your Pictures: If you’re feeling adventurous, check the box that says Shuffle. This way, your images won’t appear in the same order each time, keeping things fresh. It’s like a surprise party for your desktop every day!
- Decide on Fit: You’ll also see a dropdown for Choose a fit. This option lets you adjust how the images fit your screen. Depending on the resolution of your monitor, you might prefer some images to fill the entire screen, while others might look better centered.
- Select the Solid Color Slide: If you want to mix things up even further, you can add a solid color slide between images. This is a great way to give your eyes a little break. Just select Solid color under the Background options and choose your preferred color.
And voilà! You’ve set up your slideshow background. Every time you sit down at your computer, you’ll be greeted with a fresh scene. It’s like having a mini gallery that showcases your favorite moments or beautiful landscapes throughout the day.
Selecting the Best Images
Now, what about those images? It’s all about personal preference. You might want to choose pictures that inspire you, bring back wonderful memories, or simply make you smile. I often mix landscapes, candid shots of friends, and quirky art pieces.
Here’s a little trick: if you’re short on images, consider exploring online resources. Websites like Unsplash or Pixabay offer free high-quality photos that can easily elevate your desktop vibe. Just make sure you have the right to use them, and you’re good to go!
Experiment and Enjoy
Don’t be afraid to experiment with different folders, intervals, and fits. You might find that some images work better together than you expected or that a certain interval keeps you more engaged.
So, go ahead and set that slideshow! It’s a simple tweak that can transform your workspace and make working or browsing a lot more enjoyable. You never know — you might end up looking forward to your screen time just a little bit more!
Exploring Windows Spotlight for Dynamic Wallpapers
Windows Spotlight is like having a gallery of stunning images right on your desktop background. It curates breathtaking photos that change regularly, bringing a fresh vibe to your workspace without you lifting a finger. If you’re someone who loves variety and beauty, you’re going to find this feature pretty exciting. I mean, who wouldn’t want their desktop to feel like a new adventure every day?
Imagine waking up to a serene mountain landscape one day and then switching to a vibrant city skyline the next. That’s the magic of Windows Spotlight! The quality of images is top-notch, and they’re handpicked to inspire and energize you. Honestly, I was a bit surprised at how much I looked forward to seeing what new image awaited me each morning. It’s like a little daily gift from Microsoft!
How to Enable Windows Spotlight for Your Desktop Background
Getting started with Windows Spotlight is super easy, and you won’t need to dive deep into settings or configurations. Here’s how to enable it for your desktop background:
- Open Settings: You can quickly do this by right-clicking on your desktop and selecting “Personalize.” This will take you to the menu where you can personalize your background.
- Navigate to Background Settings: In the left-hand menu, click on “Background.” Here, you’ll see options for different types of backgrounds.
- Select Windows Spotlight: In the dropdown menu where you can personalize your background, choose “Windows Spotlight.” This will set up your desktop background to showcase those gorgeous images.
- Watch the Magic Happen: After you select Windows Spotlight, sit back and enjoy the beautiful images as they change. You might notice that some images resonate with you more than others, and that’s totally okay! Each one adds a unique touch to your desktop experience.
Customizing Your Windows Spotlight Experience
What’s wild is that Windows Spotlight doesn’t just stop at changing the images. You can actually give feedback on the images you see. If you come across one that you absolutely love, just click the thumbs-up icon. Conversely, if there’s something you’re not really into, you can give it a thumbs down. This feedback helps Microsoft refine what types of images appear in your rotation, tailoring it more to your taste.
Another feature that caught my eye is how Windows Spotlight can help brighten up your color windows. You can tweak the settings to allow for some transparency effects. Turning on transparency means that your background images can subtly show through your window color, giving your desktop a more layered and sophisticated look. It’s these little touches that make the experience more enjoyable!
The Joy of Changing Backgrounds
You know what’s also cool? If you’re the type who likes to switch things up often, Windows Spotlight makes that easy. You can set it to change the background every few minutes, or you can let it roll through different backgrounds throughout the day. It’s like having a rotating art exhibit right in front of you—who wouldn’t want that?
Plus, if you ever feel like you want to dive deeper into personalizing your background theme, you can always explore other options in the same menu. But honestly, once you start with Windows Spotlight, you might find yourself sticking with it for a while. It’s that satisfying!
So, whether you’re working, gaming, or just browsing, having a dynamic desktop with Windows Spotlight can really elevate your experience. It’s not just about aesthetics; it’s about creating a space that inspires you every time you log in. And trust me, once you start, you’ll be looking forward to seeing what beauty awaits you each day.
Customizing Your Desktop with Themes
Themes are a fantastic way to transform your Windows desktop environment, allowing you to change not just the background wallpaper but the entire look and feel of your workspace. With just a few clicks, you can create a unique ambiance that reflects your personality and mood. Trust me, when I first dove into the world of themes, it was like unlocking a treasure chest of creativity!
Exploring Themes in Windows
Navigating through the themes section in Windows is super intuitive. Just right-click on your desktop and select Personalize. This will take you to the settings where you can browse through various themes available. You’ll find a mix of default wallpapers, color schemes, and even sounds that come together to create a cohesive look. It’s like having your own personal design studio!
What’s really cool is that Microsoft also includes a range of themes that highlight different styles, from serene landscapes to vibrant abstract designs. You can even find themes that feature live desktop wallpaper, giving your background a dynamic, ever-changing appeal. Imagine having a beautiful waterfall or a bustling cityscape that moves — it’s like having a window to another world right on your desktop!
Applying and Customizing Themes
Once you’ve found a theme that catches your eye, applying it is a breeze. Simply click on the theme, and boom! Your desktop transforms instantly. If you want to take it a step further, you can customize individual elements like the background wallpaper and colors. For instance, if you love nature, you might set a tranquil landscape as your background and pair it with earthy tones for your windows and icons.
I remember one day I was feeling particularly adventurous, so I switched to a theme featuring bright, bold colors and geometric shapes. It was such a refreshing change! I felt energized every time I sat down at my computer. It’s amazing how something as simple as a theme can affect your mood and productivity.
Exploring Wallpaper Options
If you want to take your customization even further, consider using wallpaper changer apps. These handy tools can automatically cycle through different wallpapers, keeping your desktop fresh and exciting. You can set it to display a new image every hour or even every day. This means you can enjoy a variety of stunning wallpapers without lifting a finger!
Here’s a fun idea: you could choose different wallpapers for each monitor if you’re using a multi-display setup. Imagine having a serene beach scene on one monitor, while the other showcases a vibrant cityscape. It’s a great way to personalize your workspace and keep things visually interesting.
Themes from the Microsoft Store
Don’t forget to check out the Microsoft Store for new themes and wallpapers! There’s a dedicated section where you can explore a plethora of themes created by artists from all over the world. Some themes are even free! Plus, you’ll find seasonal themes that change with the holidays, adding a festive touch to your desktop.
When I stumbled upon a Halloween-themed desktop wallpaper — complete with spooky colors and whimsical pumpkins — I couldn’t resist downloading it. It instantly brought a smile to my face, and I felt more in tune with the season.
Explore Even More Themes on Themes10.win
If you’re looking for something beyond what the Microsoft Store offers, check out Themes10.win. There you’ll find a huge collection of custom Windows themes: from anime and gaming-inspired designs to breathtaking nature landscapes, minimalist and abstract styles, and even ultra‑sharp 4K backgrounds. Need something special for a dual monitor setup? You’ll discover plenty of options that look stunning across two screens too. Whether you want to freshen up your desktop or completely transform your workspace, Themes10.win makes it easy to find the perfect fit.
The Power of Personalization
Personalizing your desktop with themes is not just about aesthetics; it’s about creating a space where you feel comfortable and inspired. Whether you opt for a simple wallpaper or a full-fledged theme with coordinated sounds and colors, each choice adds a personal touch to your digital environment.
So go ahead, dive into the themes section, and experiment! You might just discover a new favorite that makes your daily routine a bit more enjoyable. After all, your desktop is a reflection of you — why not make it fabulous?
Managing Multiple Displays and Backgrounds
If you’re working on dual monitors, customizing your backgrounds can significantly boost your productivity and add a touch of personal flair to your workspace. Having unique wallpapers for each monitor can help you keep your projects organized and make your setup visually appealing. Let’s dive into how you can effectively change the background theme for your multiple monitors.
Setting Up Backgrounds for Each Monitor
To start, right-click on your desktop and select Personalize. This will open the Settings menu where you can access the Background options. Here’s where the magic happens! You’ll see a preview of your current desktop theme and a dropdown menu where you can select the Background type.
Now, the fun part: if you have more than one display, you can choose different backgrounds for each monitor. Click on the picture you want to use and then right-click on the monitor you want to apply it to. It’s straightforward! Imagine having a serene beach scene on one screen and a vibrant cityscape on the other—it not only looks cool but can also inspire different vibes as you switch tasks.
Choosing the Right Themes
When you’re ready to explore more options, head over to the Themes section in the Personalization menu. Here, you can browse various colorful themes available on the Microsoft Store. You’ll find built themes that can easily transform your desktop without much hassle. Just scroll through and see what catches your eye.
You might want to try a theme combination that reflects your personality or matches your current project. For instance, if you’re working on something creative, a bright, energetic theme might keep you motivated. On the flip side, if you’re tackling something more analytical, a calm, minimalist background could help you focus better.
Applying Virtual Desktops
What’s wild is that you can also apply different backgrounds to virtual desktops. If you haven’t used this feature before, it’s a game changer! Just press Windows + Tab to open the Task View, and then you can add new desktops by clicking on New Desktop. Each virtual desktop can have its own theme, making it super easy to segregate personal projects from work tasks.
To change the background for a virtual desktop, select the desktop you want to customize, then follow the same steps to change the background theme. This way, you have a clean slate for each type of task or activity without mixing up your visual cues. It’s like having a workspace that adapts to your needs!
Customizing with Live Wallpapers
Have you ever thought about using video live desktop backgrounds? It’s a unique touch that can add some life to your setup. You can find options online, and once you download your favorite, just make sure to apply it through the same Background settings. I tried this once with a flowing waterfall video, and let me tell you, it completely transformed my workspace vibe. Just be cautious; too much movement can sometimes be distracting, so pick something that enhances rather than overwhelms!
Final Touches and Considerations
When you’re setting these backgrounds, remember to think about how they work with your workflow. Having a clutter-free desktop theme can help you concentrate better. If your work involves a lot of reading or analysis, a simple, solid background with minimal distraction might be best.
Overall, managing multiple displays and backgrounds is all about finding what works for you. Experiment with various themes related to your interests, and don’t be afraid to mix and match! It’s all about creating an environment that stimulates and inspires you as you navigate through your tasks. Happy customizing!
Troubleshooting Common Background Issues
Changing your desktop background can sometimes lead to unexpected hiccups. If you find that your new wallpaper refuses to apply or your settings seem to reset, don’t worry—many users have faced similar issues, and most fixes are quite simple.
One common problem is when the wallpaper doesn’t change at all. If you’re using the desktop context menu to select your new image and nothing happens, it might be due to a glitch in the settings. First, try opening the Settings app by clicking the Start button and selecting Settings. From there, navigate to Personalization. It’s a straightforward path: Settings > Personalization. Once you reach the Settings window, ensure you’re on the Background tab. Sometimes, just re-selecting your chosen image can do the trick.
I remember a time when I was trying to customize Windows with a stunning landscape photo. I followed all the steps, but my wallpaper just wouldn’t stick. After a quick search, I found out that sometimes Windows needs a nudge. Restarting my computer resolved the issue, and boom! My beautiful wallpaper was there to greet me.
If your background keeps reverting to the default, it could be due to a third-party software app interfering. Software designed to manage your desktop, like changer apps, can sometimes conflict with Windows settings. Check if you have any of these running. If you do, try disabling or uninstalling them temporarily to see if that resolves the issue.
Another frustrating issue is when your wallpaper appears blurry or stretched. This can happen if the image resolution doesn’t match your screen’s aspect ratio. If you’re browsing for new images using the Browse button, make sure to select high-resolution pictures. Ideally, look for images that are at least 1920×1080 pixels for a full-HD display. If you want to get fancy, you can even set the Background option to “Fill” or “Fit” to adjust how the image looks on your screen.
What’s wild is that sometimes the settings can just get a bit jumbled after a Windows update. The last update in September caused a few quirks for some users, where the Settings window seemed to forget their personalization choices. If you suspect an update might have altered your settings, revisit the Settings window and check the Related settings. You might need to set your preferences again.
If you’re still stuck, don’t forget about the classic troubleshooting step: logging out and logging back in. It’s like giving your computer a fresh start. Sometimes, all it needs is a little break to reapply those settings correctly.
Lastly, if you’re using multiple monitors, make sure you’re customizing the correct screen. When you choose personalization, you might be accidentally applying the changes to a different monitor. Just select the desired screen in the Settings window before making changes.
Navigating these issues can be a bit of a hassle, but with a patient approach, you’ll likely find that the solutions are right at your fingertips. Remember, you’re not alone in this—many have walked this path before and found their way back to a beautifully customized desktop!